If you are running an international company or blog, it should load fast from anywhere. In other words, wherever your visitors come from, your site should feel snappy.
But this sounds not like an easy feat. How do you set up a fast global WordPress website, loading fast from any location? In this article, I will explain what you need and what steps you need to take; and how you can easily do this with Rocket.net.
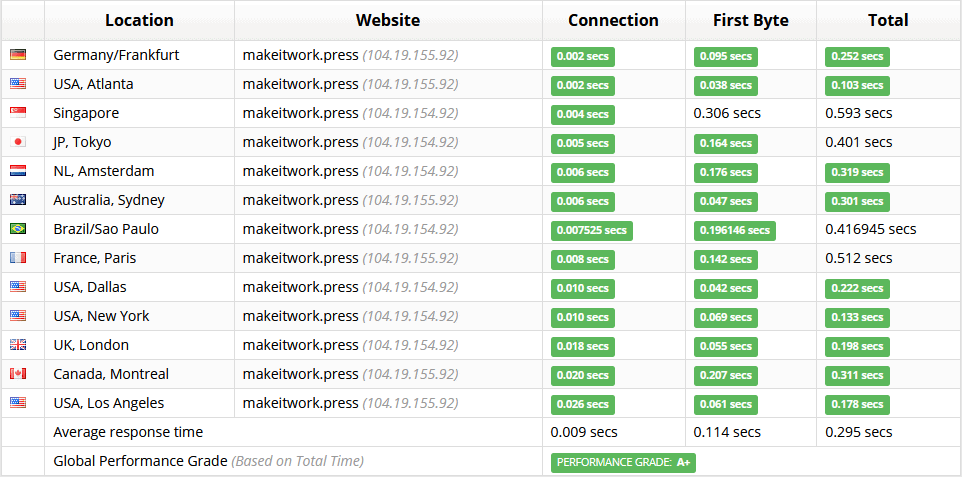
And here’s just a sneak peek of what can be achieved:
Starting with Speed Optimization
For all speed optimizations, two overarching terms matter:
- How well your aplication software, in this case WordPress is optimized.
- How well your server (and network it is connected to) is optimized.
In an earlier post, I already discussed how to speed up WordPress. Now I will focus on the server and network part. If you want to focus on a website that runs fast worldwide, globally, from, anywhere, you need to focus on that. It is a major contributing factor.
In essence, you need to consider three factors that improve the overall delivery of your site Worldwide.
Three steps for making a fast global WordPress website
These are the three steps you can take to make your site run faster globally:
Factor 1: Choose a well-connected data center close to the majority of your visitors
If you are not familiar with hosting, you may not be aware that your WordPress website is running on a real physical computer in a data centre that is connected to the internet. The latter sentence is basically the definition of web hosting.
And the physical location of your server matters. The closer the server is to the majority of your visitors, the faster it will load for them. You can easily use something called Google Analytics (there are some great alternatives to Google Analytics, by the way) to identify where all your visitors are coming from.
If your web host has the possibility to pick the data centre location of your website, pick the closest one.
Also, make sure that the data centre of your hosting provider is close to global networks junctions. This will greatly improve the so-called latency of your website, chipping off valuable loading time. Some examples of data centres that may be well connected are:
- Amsterdam
- Dallas
- Frankfurt
- Helsinki
- London
- Los Angeles
- New York
- Seattle
- Singapore
- Sydney
However, factor 2 and 3 make a major impact.
Factor 2: Use a content delivery network

A very lame definition, but a content delivery network is a network that improves how your content is delivered.
But what does that mean in practice?
Your website has various pieces of content. You may think of text and words if you think about content. But in technical terms, website content is composed of images, scripts and so-called stylesheets.
If you use a content delivery network, these pieces of content are stored on a network of servers all over the world.
One of the most famous providers of a content delivery network is Cloudflare. We’re using it too, as a lot of other companies do. It has over 200 locations worldwide where content is served, so a big change your content will be served from a location close to your visitors.
By the way, if you only have local visitors close to your hosting company’s data centre, using a CDN is not really needed and can even slow down your site.
And if you are using LiteSpeed, you may want to look into QUIC.cloud, which is a CDN that greatly integrates with LiteSpeed and the LiteSpeed cache plugin (read here on how to set up QUIC.cloud for a more secure and faster WordPress website).
Factor 3: Cache your complete website on the edge (content network)
If you have a website that is mostly static, it makes a lot of sense to cache your complete website no the edge. And that sounds fancy, but what does it imply?
What are static websites?
Let’s start with the term static website. A static website is basically a website where on the front-end, a user does not really need to log in or have any data that is associated with him or her. A dynamic website on the other hand has dynamic content, and a good example of this is webshops.
What is caching on the edge?
Now, what does the second term, caching on the edge, mean? Well, let me explain. WordPress is built in PHP (and other languages), which is a server-side language. Each time a visitor visits your website, the server where your website is running needs to run PHP and do some calculations to show the website. In other words, the page is dynamically generated by the server.
Even if your page is exactly the same for every visitor, it needs to rerender this page and do this. Unless you use caching. With caching, a static copy is made from each page. This is basically the version that was dynamically generated.
This exact, static copy, is served to every visitor and the server doesn’t need to run a costly dynamic process. And that makes your website load a lot faster.
Now, with a CDN, you can already serve content such as images and scripts. But with caching on the edge, your complete website (well, at least a cached copy) resides on the content delivery network.
Your visitors don’t need to make a roundtrip to your website’s server, but just to the servers of the content delivery network. And if they are close, that will load a lot faster.
It’s however, harder to cache a dynamic website, as every visitor will see a unique website (such as an order overview of the contents of a shopping cart which are personal). Thus, you can’t serve a copy.
Caching Plugins for Caching on the Edige
There are some powerful plugins such as the Cloudflare plugin and the WP Cloudflare Super Page Cache that can cache your WordPress website on the edge and allow for exceptions. And in this case, in Cloudflare’s edge.
LiteSpeed (a technology for running a web server) also has a great plugin called LiteSpeed cache that integrates with QUIC.cloud, which also has an option to cache your complete website on the edge.
But for now, these plugins are a topic for another post.
In this topic, I will explain how you can easily do this by using a hosting provider.
Use a WordPress hosting provider that offers a CDN and Edge caching
Although the before steps are not difficult to sort out if you are a developer, they will take time configuring. The easiest way is to opt for a WordPress hosting provider that already provides the earlier mentioned factors.
Luckily, there are a number of great WordPress hosting providers that have the above functionalities already included in their offerings, such as Kinsta, Rocket.net and WPX.
In the following, I will explain step by step how you can set up a crazy fast global website with Rocket.net. You can also view these steps in the below video.
Step 1: Pick an offer and Register at Rocket.net
Start by selecting a plan, which starts only from $30. That may sound like a lot, but the value for what you get is great. It’s not really much if you want to run a worldwide website that needs to be succesful.
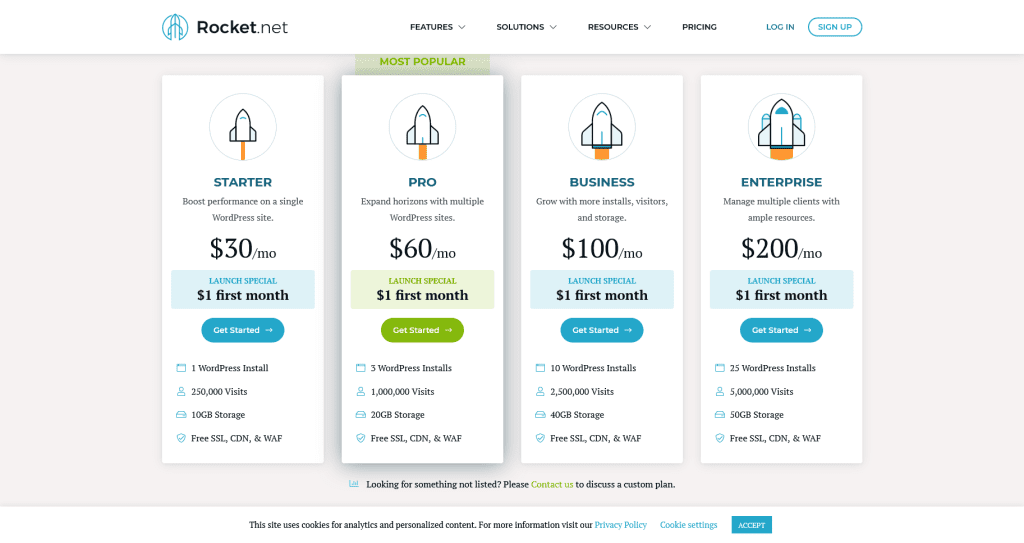
It’s just $1 for the first month, so you can always try them without having to unload your wallet. Just click Get started and follow along.
Step 2: Add a new Site
Great, you are now registered and you can add a new site! The process is straightforward.
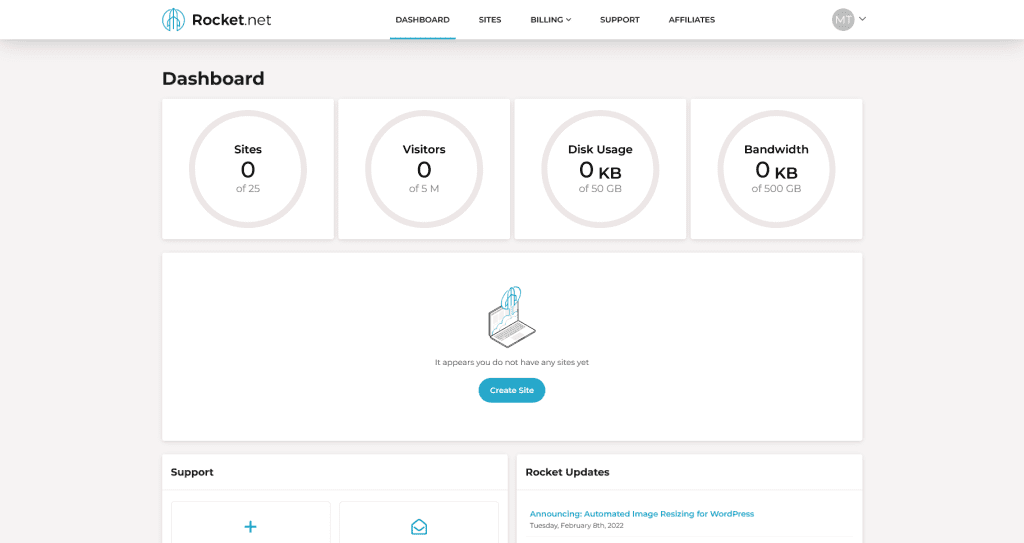
Add a new site by clicking the create site button, it should look similar to the screen above.
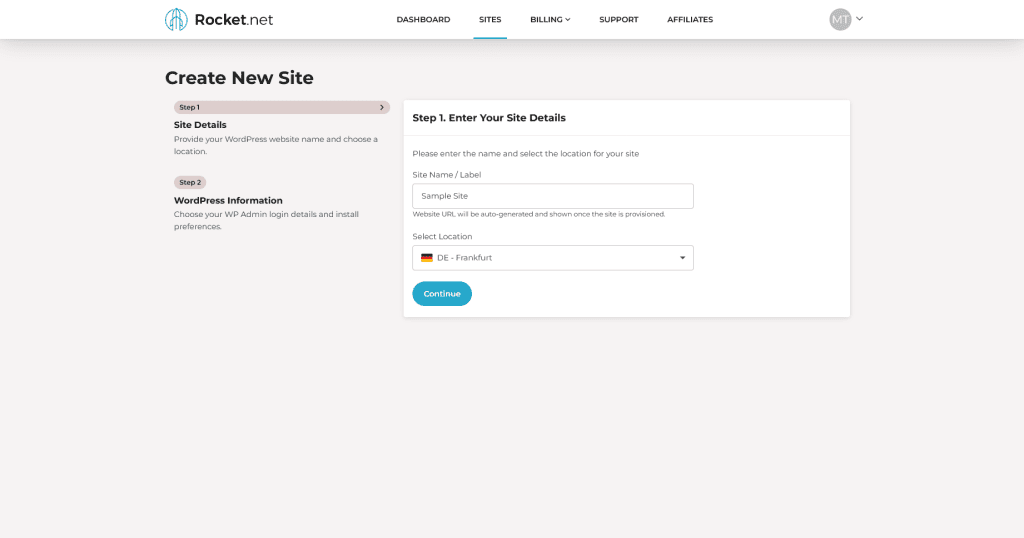
Fill in a name and a location for your site. While Rocket.net runs fast anywhere, still pick a location close to the majority of your visitors.
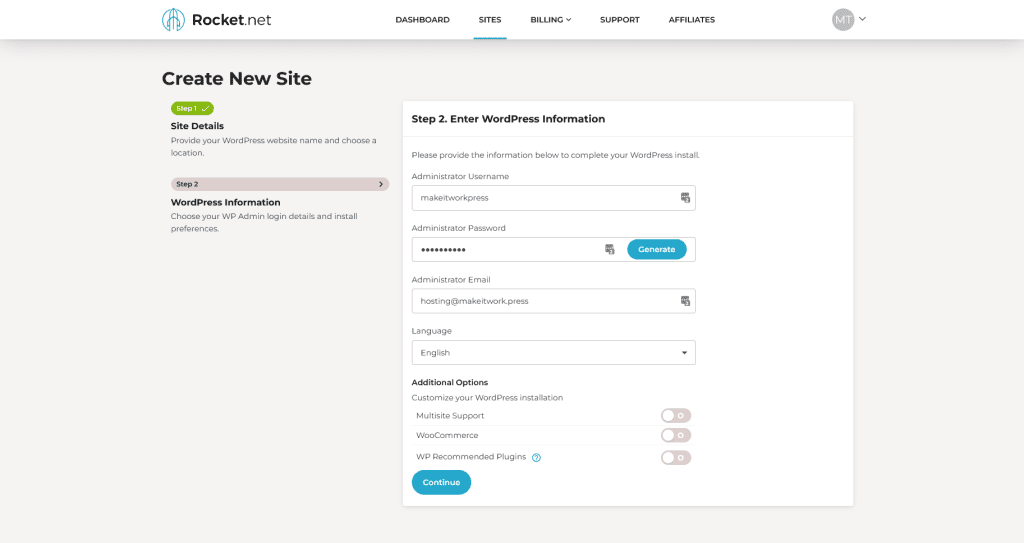
You can then fill in your WordPress login details, language and any optional settings. Hit continue and your site is created.
Step 3: Work on your temporary site
By default, this site will be on a temporary domain. You can already do your website editing on that, even if you don’t have a domain. This is what the portal of Rocket.net looks like when managing a site:
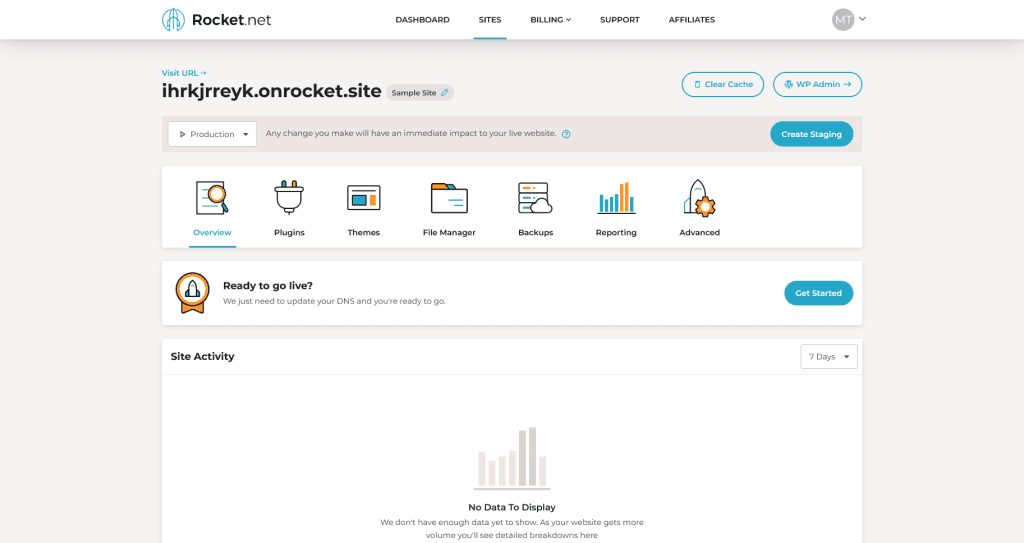
Do you see the ready to go live section? When you’re done, you can put the website live there. But first, let’s dive into domains.
Once you are ready, you need to register a domain, which is the address people will type in to visit your website. In this case, we will be using Cloudflare, but you can also use a service such as Namecheap.
Step 4: Register a domain at Cloudflare
Before you register a domain, you need to set up an account at Cloudflare. It’s easy, just hit the Sign Up item on the top left at cloudflare.com.
Once you’re registered, you can log in. Before you can register a domain, you need to add a payment method. This can be done by going to the account on the top left and then selecting billing.
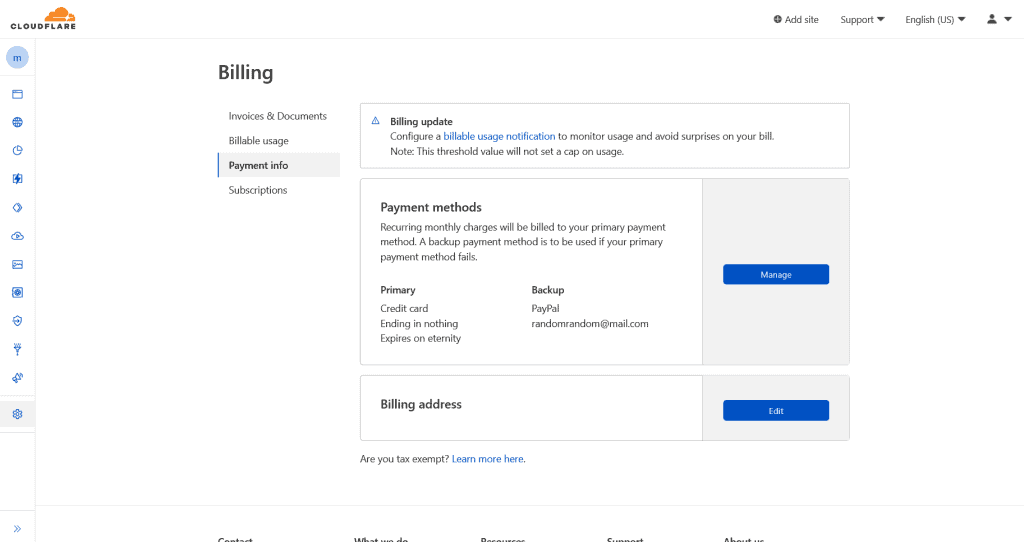
there’s a catch though, Cloudflare supports both credit cards and Paypal so you need one of these payment methods.
Once you have set up billing, you can go register a domain. In the menu on the left, there is an item called ‘Registar’. Go there.
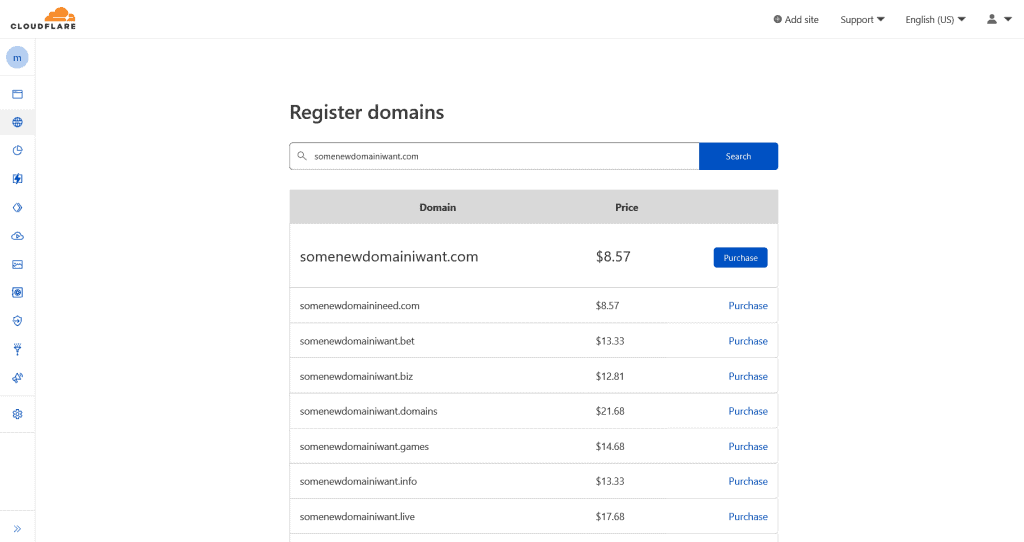
Type the domain you want. Cloudflare supports most important domain extensions, except country specific extensions. For that, you can use another Registar such as Namecheap.
Cloudflare sells domains at wholesale cost. Meaning domains are really inexpensive.
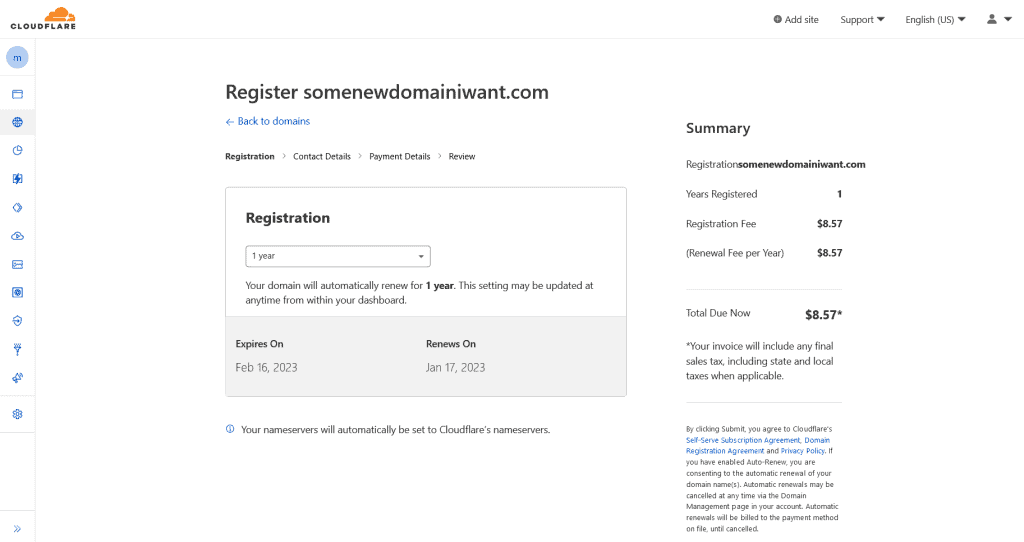
Proceed with the payment screens. Your domain is now registered! It can take some time before registration is complete, so you need to wait here.
Step 5: Connect your domain at Rocket.net
Now, go back to the portal at Rocket.net. The domain is registered, so let’s go live!
First, click on Get started button in the ready to go live section. You can now enter the desired domain of the website, which will be the domain you just purchased.
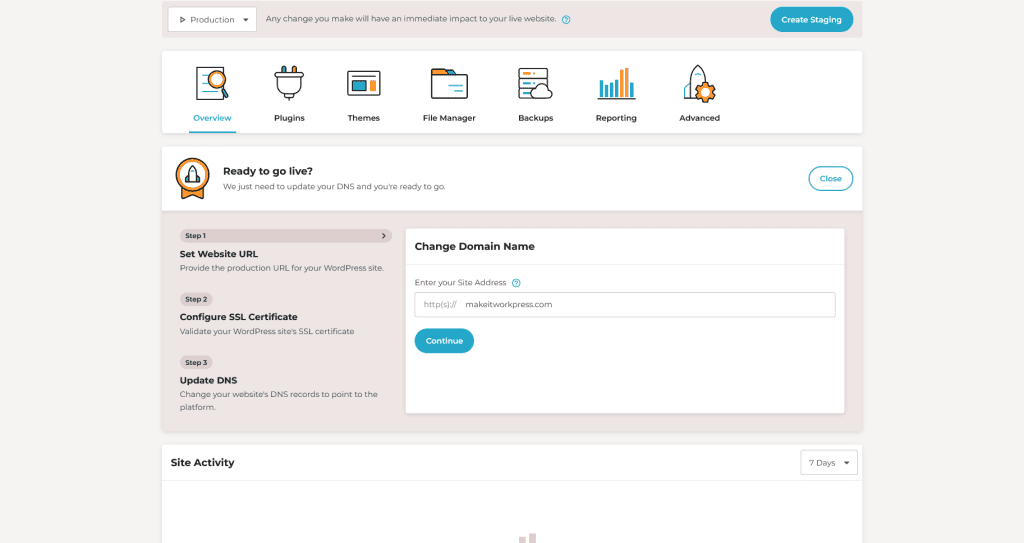
After entering the domain, you may need to configure an SSL certificate. This can also be skipped, or you need to add the value as a TXT record in Cloudflare. I will explain this as well in step 6.
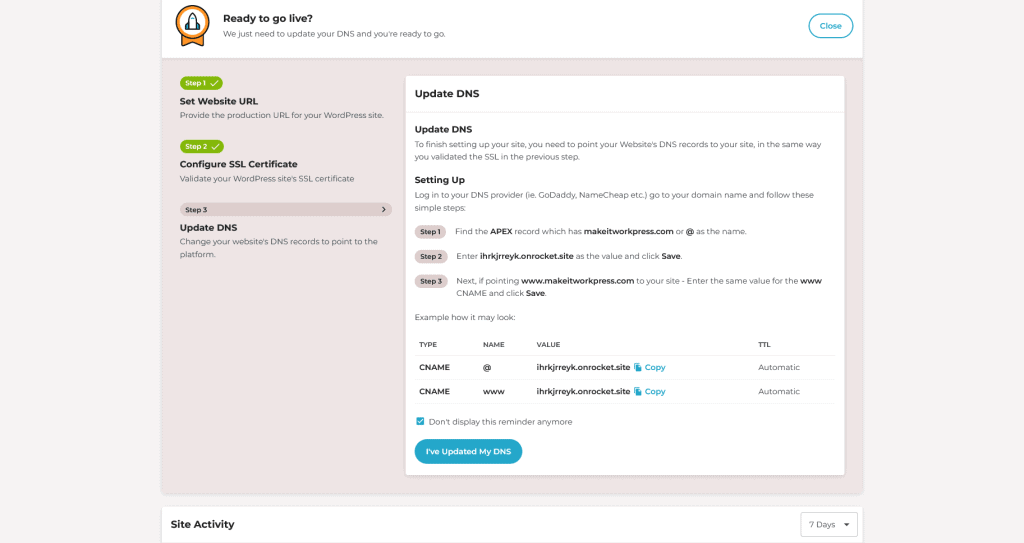
Subsequently, you need to update your DNS records in Cloudflare. The next step will show you how.
Step 6: Add the correct values in Cloudflare
Select the domain you registered at Cloudflare in the main dashboard. After this, go to DNS in the menu on the left. You can now alter your DNS settings.
If you have any A record there, delete it as it will mess up the configuration.
Subsequently, start by adding a so-called CNAME record (click “Add record”, select CNAME at Type). Fill in the values that you got from Rocket.net. Make sure to toggle the Proxy status to off, as Rocket.net is already taking care of that.
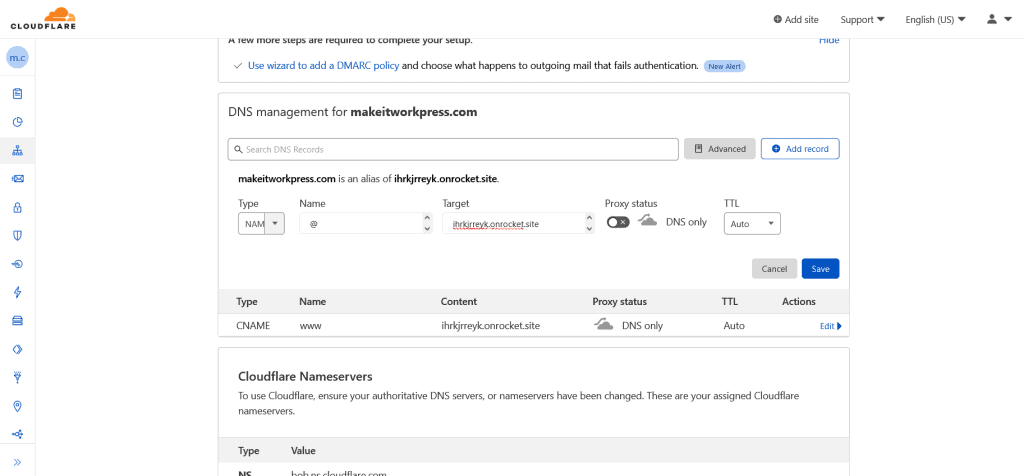
If you have an existing CNAME record for www, you also need to change it (or add it if you don’t). This is what I ended up with:
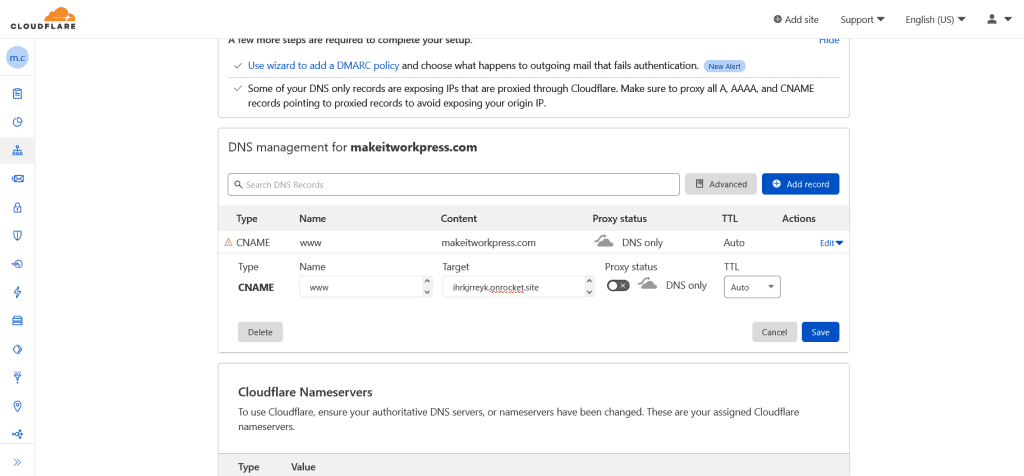
In a similar way, you can add the TXT record for the SSL verification. Just use TXT as Type instead of CNAME, and you are good to go!
Step 7: Enjoy a speedy ride
And you are already done! You should now have a WordPress website running on Rocket.net on the domain you just registered!
Let’s look at what a difference it can make, the below figure is from a global loading test.
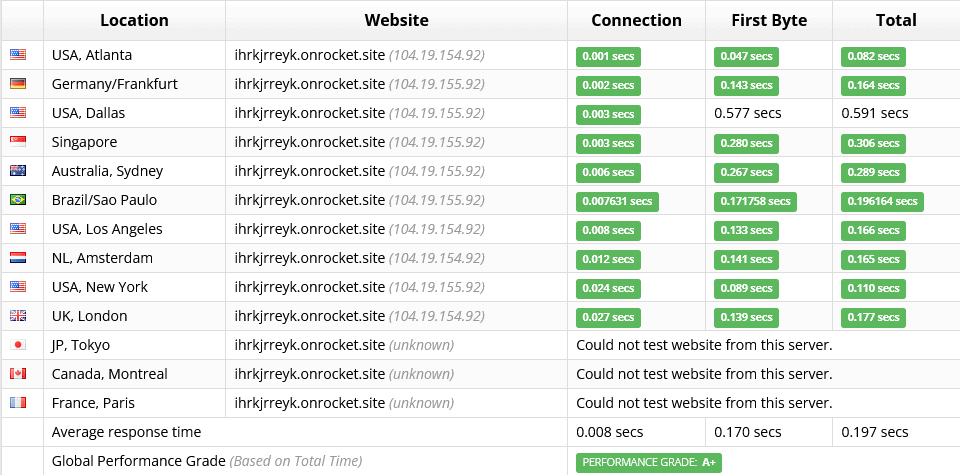
As you can see, the site loads incredibly fast from anywhere. And that’s the power of Rocket.net, a hosting provider I can really recommend. You can also read an elaborate Rocket.net review here.
The $1 launch deal for your first month at Rocket.net is still available. Sign up here and make your website fly!